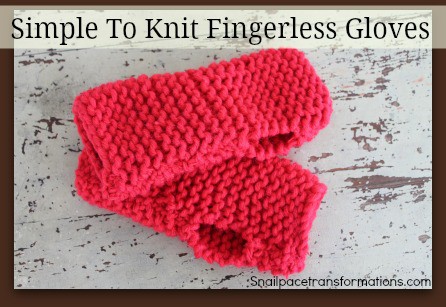
Simple To Knit Fingerless Gloves
If you are a beginner knitter or perhaps a more experienced knitter looking for a quick project, this pattern for fingerless gloves will be a good fit for you.
People surprise me all the time when they call me a talented knitter. I know only two stitches knit and purl. I also cannot read a pattern. Yes, you read that right, I cannot read a knitting pattern to save my life! All the knitting I can do, I have either been shown, or I have made up my own pattern by merely looking at something I have liked and creating it by trial and error.

Which is precisely how these fingerless gloves were created. I knew someone with a pair, and she let me stare at them and tug and pull at them until I was reasonably sure I could create something close to them.
Simple To Knit Fingerless Gloves
(Links in this post are affiliate links. I will be compensated when you make a purchase by clicking those links. See my disclosure page for more information)
These gloves take one ball of thick heavyweight yarn. If you like a touch of wool for warmth, Wool-Ease Thick and Quick is a great option. If having wool in your gloves is not essential, this Hometown USA yarn also by Lion Brand is just slightly less thick and generally costs less. I have made two pairs with this yarn, which I got on clearance at after Christmas sales. It is very thick and knits up fast.
I am a pretty fast knitter and managed to make the gloves in one evening and stitch them up in a second evening. I feel safe saying a confident knitter could make these fingerless gloves in less than 4 hours.

I first cast on 18 stitches on my size eight bamboo needles. I left a good size 3-inch tail at the beginning.
(Every knitter must try bamboo needles, trust me once you try them you will never go back to metal or plastic)

Once I had knitted about one inch up, I measured the glove across the bottom so that you could gauge your tension with mine. Your piece should be roughly 8 inches wide; if it is not, you can do a few things to correct it. First, you will have to take out all your stitches and start over (sorry). If your piece was too narrow, try going up a needle size or casting on a few more stitches. If it was too wide, try smaller needles or cast on fewer stitches. Play around with this as many times as necessary, and when you get it to the right thickness, make a note of how many stitches you cast on and what needles you used for next time. I keep a blank journal in my knitting bag just for this purpose.
This is the knitting bag I own and I highly recommend it. It has served me well for several years. Plenty of room for all your knitting supplies for on the go knitting –or am I the only one who knits while her husband drives?

Keep knitting until you reach 8 inches in length, which for me was 40 rows (make sure to make a note of how many rows it took you). At this point, go ahead and cast off. Again leave a good size 3-inch tail before cutting the yarn when you are done. You should end up with a perfect 8 inch by 8-inch square.

To stitch up the side seams, you are going to need a large yarn darning needle ( the official name is a Yarn Large-Eye Blunt Needle)

The wrist to thumb seam should be 4 to 5 inches in length.

The top to thumb seam should be two inches in length.

I don’t know if I do this correctly, but it works. I stitch hump to hump to make my seams.

Make sure to leave 3 to 4 inches of yarn after you knot off each seam.

I weave these ends into the insides of the gloves before I cut them off so that they remain invisible. If the ends should come out when you wash them, you can either re-weave them in, or if you don’t mind the look of a lumpy knot, you could just the yarn about 1/4 of an inch from the knot giving it room for unraveling (weaving is neater though).

Here is what the finished product will look like.
For another simple knitting project, check out my hand-knitted Christmas Tree Ornament Tutorial.
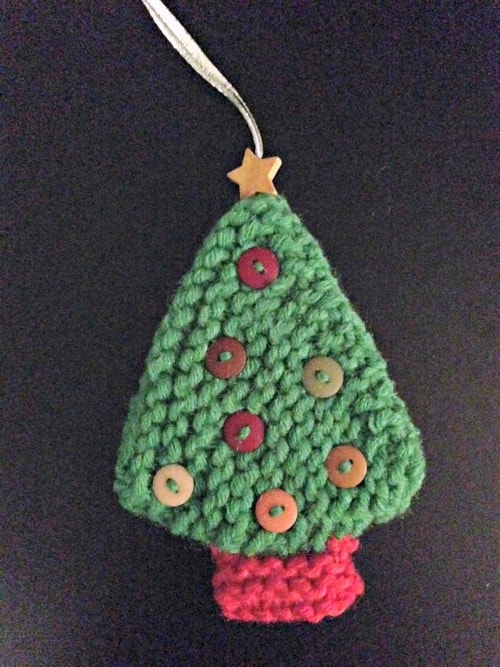
This handknitted Christmas tree ornament is relatively easy to knit up and makes a nice addition to any Christmas gift. Tie it on a gift instead of a bow.
Another Post For Knitting Fanatics
Ingredients
Method
- cast on 18 stitches (leave 3 inch tail)
- when you are 4 or 6 rows in check and make sure it measures 8 inches in width if not adjust pattern to suit your tension (see notes in post)
- knit until you have 8 inches in length ( approx. 40 rows)
- cast off (leave 3 inch tail)
- fold square in half (width wise so rows are going across hand)
- sew up 4 inches from the bottom and then stop
- sew down 2 inches from top and stop
- weave in ends and trim
- (see pictures in post to help guide you along the way)